Showing posts with label Shirt. Show all posts

Thursday, July 10, 2014

Fastest Tshirt Refashion EVAR! (no sew!)

So after a couple false-starts on refashions (where either something didn't work, or my end pictures didn't turn out right), I just wanted to get SOMETHING done to show you guys I'm still alive!
And I found the perfect candidate.

It's not a bad shirt! Men's Medium?

It's been MONSOONING all afternoon, so comfy clothes was the order of the day. This tshirt is fine, as far as regular ol' comfy tshirts go, but I wanted something cute as well as comfy!

I was inspired by the trimming done on this refashion by CTA Glam Couture
Someday I'll do their actual thing - the darts looks cute!
 
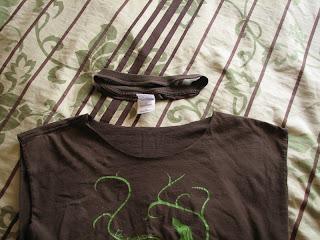
So I layed that shirt down and did some snipping!
I cut about an inch from the collar on both sides, and just under the collar on front and back.
 The sleeves were still lacking something for me, so I made another snip!
Right up the middle!

Then I took those two cut pieces and tied them together in a knot.

And that was it! Ta-dah!
Still comfy, loads cuter!
You know you want to go do this now ;)

Seriously, guys - it took longer to take the pictures than to do the refashion. Yay for a quick no-sew!
Thanks for stopping by!
Mwa!


Friday, January 17, 2014

'Meh' to 'Marvelous!' shirt refashion - take 2!

So you remember that bright green shirt - and how I tried to turn it into a skirt, but it didn't work?
Well, I had another shirt EXACTLY like it, except it was white. So why not try the same idea again, having learned from my earlier mistakes?

Shirt to skirt refashion, take 2!

I decided for this one to cut straight all the way across the top, instead of leaving a funny round hole like I did last time.
Notice that I didn't cut into the sleeves at all. That's important for later.

I pinned closer to the sleeve-seam as well, and made a nice straight line with my seam.
Pull 'em out as you go!

Because of last time's fiasco, I tried it on right after I'd sewn the second seem. The results???

No dice, guys. At least for my tender, modest sensibilities, I'm thinking t-shirt skirts are going to be just too tight on me.
BUT! I already knew how to save this! But I didn't want to do the exact same thing as last time.

Trim off the excess! Save those sleeves!

I flipped it upside down, so the wide, hemmed bottom became the new top - and then I gathered the new top into pleats to make it fitted!
Gasp! Instant tube-top!
Here's an up-close of the pins on the inside, in case you were wondering :)

The bottom needed hemming now, so I made a nice flat hem with a zig-zag stitch to preserve stretchiness.
I know, the pins are facing the wrong direction. OOPS. It just means a tiny bit more work as you go, no biggie.

The pleats needed to be hand-sewed together, as they'd be too thick for my poor machine.
Carefully doing some invisible stitching to hold it all together!

Now remember those sleeves I was so careful not to damage during the first cut? Good thing I saved 'em!
I trimmed them both into thick, slightly curved straps.

And once again sewed a lettuce-hem around that raw edge with a zig-zag stitch.
Make sure to pull tight as you go, or you won't get those pretty ruffles!

So then it was just pin those buggers on, sew 'em up, and there you have it!
TA-DAH!!!
Oooooh!

I have to say, I think I'm the most happy about this one than any I've done in a while!
Ahhhh!

So there you go! Two different shirt refashions from the same basic style! What will YOU do with your tshirts??

Mwa! <3


Wednesday, January 15, 2014

'Meh' to 'Marvelous!' t-shirt refashion!

How's your winter going? Ours is turning rather warm at the moment - no complaints here! And in honor of this spring-like weather, I bring you a summery t-shirt refashion!

I started out with this lovely donation here:
Howww shall I do eet?

Taking inspiration from Jillian over at Refashionista, I wanted to try turning a shirt into a skirt! Seems simple, yes?

I started by snipping off the collar.
Bye, itchy tag!

And then widened the opening by 1-2 inches on each side.
Eyeballing totally fine here.

I then pinned (forgot to photograph that step, sorry!!) and sewed a diagonal line up each side from an inch above the bottom up to the old shoulders.
Say "g'bye", sleeves!

I tried it on. There was actually a lot of trying on and fiddling at this point . . . and I finally gave in and realized it just wasn't going to work. Not as a skirt . . . too tight. (I'll save you the embarrassment of showing you the evidence :D)
This is why it's always good to let something rest when you're frustrated with working on it! I'm SO glad I didn't stop there and give up.

The next day I tried it back on and realized it made a really CUTE baby-doll shirt - it just needed straps!
Quick, get those sleeves you just chopped off!
Snip them free of the remains of the shirt, and then snip the sleeve open.

The original sleeve hem was going to be my strap, and the wide part the new cap-sleeve. It need hemming!
zig-zag stitch, and stretch the fabric as you go, and what do you get?
These super cute lettuce hems!
I ended up having to trim the sleeves back and needing to hem them AGAIN, but you get the idea.
I tried it on and pinned the new sleeves where they'd give me optimal coverage

And then sewed those buggers on!
Whrrrr!

The last little step was hand tacking the straps to the top of the shirt so there wouldn't be any weird floppy bits.
So that's the bottom of the sleeve/strap on the left, and I'm sewing it to the top of the shirt. Clear as mud?

And that's it! TADAHHH!
A nice long baby-doll!
Look how cute those new sleeves are!
And check out the back!

I'm rather proud of how this turned out! What do you think? Seems doable? I'd love to see your shirt refashions!

Mwa~!

Friday, June 28, 2013

Tshirt DIY: Boxy to Foxy!

Today is a t-shirt refashion!
(Can you tell I'm doing the simple stuff right now? It's TOO HOT to be stuck in front of the sewing machine for hours!)

I started with this old tshirt from college.
Regular old tshirt!

But its got a cool design on it - it should be cooler, to match!
I started by chopping the sleeves off, right next to the hem.
Snip carefully!

Then I turned it inside out, layed a shirt that fits well over top, and pinned up the sides.
So much easier than trying to pin it while you're wearing it. I seriously need a mannequin.
Yay, pins!

And ran it through the machine!
I just reverse-stitched at each end, so I didn't bother to tie the strings. Laaazy....
The neck is where I wanted to get fancy. I started by chopping off the original collar.
Bye-bye, annoying tag!

And then I took inspiration from a pinterest tutorial (which I can't find right now - sorry!!), and began to make incisions!
All the way around the neck!

My holes started off too small, actually, and I had to resnip them to about 1-1.5" long before it worked well.
We're faux-braiding the collar!
You start by taking the second strip,
This one here

And pulling it through the first hole, like so.
Puuuull!

Then you take the next one and put it through your new loop, and continue to do that all the way around! I decided I liked the look, and made more cuts along the back of the shirt.
Bigger, this time! This length works MUCH better!

Now when you're done hooking loops together, you've got a faux-braid around your collar! But how to finish it off? This is what I did;
This is the last strip I had, right on the seam.
I snipped the tiny bits attaching it, so it was a separate strip
I pulled it through the last remaining loop. . .
And here I'm indicating the start of the whole braid, the very first hole. I stuck it through that.
Once it was through that last hole, I just hand-sewed it in place with a few quick loops.

And that's it!
Ta-dah!

Now I've got a cute, sleeveless/cap-sleeve shirt with a braided collar! And the faux-braiding did some gathering/ruching all on its own, which I think looks rather lovely.
And I like that I left the bottom a little more flowy. Comfy!

And if you're liking the dragon on that shirt, you should know it was designed by my old roommate! She's a graphic designer and webcomic artist; go check out her webcomic, Wake The Sleepers!

That's all for today - time for me to go sit in front of the fan again!
<3